
IP KVM Remote Control and Custom Development Solution
This solution integrates video capture, USB keyboard and mouse emulation, and network connectivity on one controller board for viewing and operating a host remotely. It emphasizes open application-layer interfaces, custom development, highly integrated hardware, and cost effectiveness, allowing developers to build their own interfaces, workflows, and management tools on top of the remote-control functions.
Developers can reuse the board's video, audio, and USB capabilities and focus on the application layer. Integrated hardware reduces the connections and adaptation work required between separate modules, helping control system integration costs and development effort.
1. Connections and hardware integration
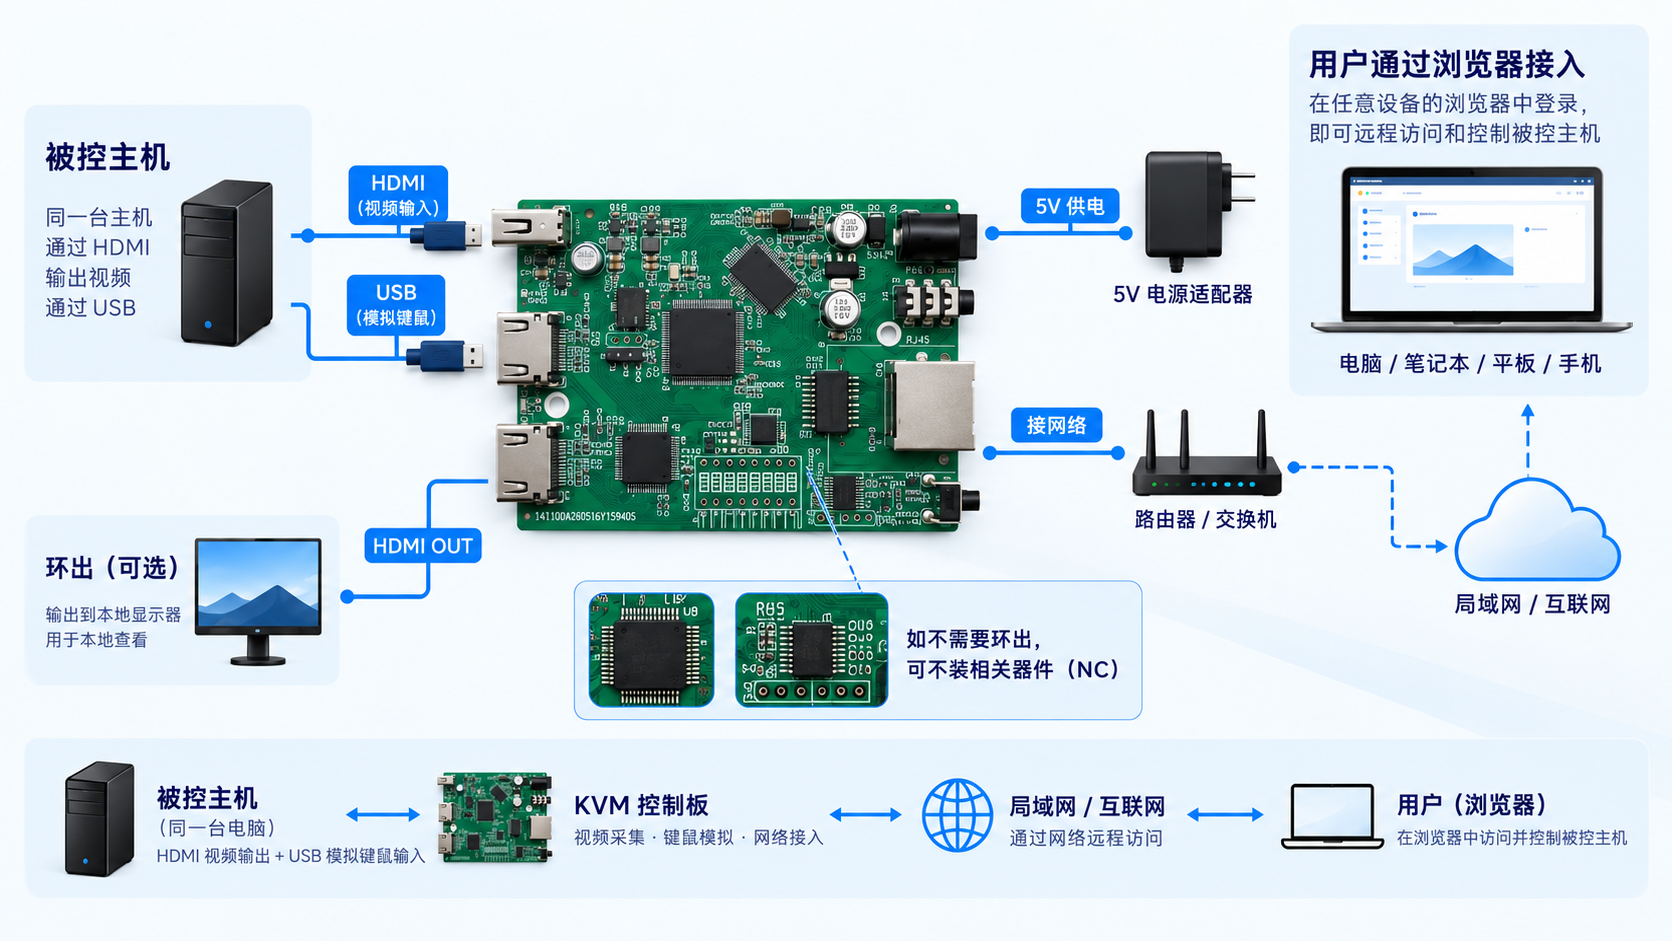
HDMI and USB must connect to the same controlled host. HDMI supplies the video input, while USB provides keyboard, mouse, and storage emulation. The board connects to a router or switch through Ethernet and uses a 5V power adapter.
| Connection | Purpose |
|---|---|
| Host HDMI → board video input | Capture the host's display |
| Board HDMI OUT → local monitor (optional) | Loop video out for local viewing |
| Board USB0 → host USB | Provide a composite HID keyboard/mouse and MSC emulated USB drive |
| Board Ethernet → router / switch | Carry video and remote-control traffic |
| 5V supply → board | Power the controller board |
| User browser → board web interface | View video, operate keyboard and mouse, and upload files |
HDMI loop output is optional and can connect to a local monitor for viewing. If loop output is not required, the associated components can be left unpopulated to further control hardware costs.
2. Open application-layer interfaces for custom development
Board-side application controls let developers invoke video, keyboard, and mouse functions through a serial console or shell and build custom workflows around them. Run all commands below on the controller board.
| Interface capability | Custom development opportunities |
|---|---|
| WebRTC start/stop and video control | Connection workflows, preview interfaces, and session management |
| 8-byte keyboard input | Shortcuts, key combinations, and automated operations |
| 4-byte relative mouse input | Relative movement, buttons, and scrolling |
| 6-byte absolute mouse input | Remote image coordinate mapping and pointer positioning |
| USB composite device and file delivery | Integrate file delivery into application workflows |
| Desktop reception and status display | Network diagnostics, reception status, and error reporting |
Release resources used by the demo before development
The demo starts IP KVM automatically at boot and uses video and audio interfaces. Before replacing it with your own application, disable the default application's automatic startup to avoid resource conflicts:
echo stop > /data/appcfg
sync
To restore default IP KVM startup:
rm -f /data/appcfg
sync
Power-cycle the board for the change to take effect. Open application-layer interfaces support customization; confirm the available interface documentation and deliverables during project discussions.
Video control examples
Send application commands through /tmp/hdmi_udp.cmd:
# Start WebRTC
echo webrtc > /tmp/hdmi_udp.cmd

# Stop WebRTC
echo webrtc stop > /tmp/hdmi_udp.cmd

# Stop video
echo stop > /tmp/hdmi_udp.cmd
Keyboard and mouse input examples
Keyboard input uses eight bytes: byte 1 contains the left/right Ctrl, Shift, Alt, and GUI modifier bits; byte 2 is reserved; bytes 3–8 contain ordinary key scan codes.
# Enter keyboard mode, send a key, then release it
echo kbd > /tmp/hdmi_udp.cmd
echo 00 00 04 00 00 00 00 00 > /tmp/hdmi_udp.cmd
echo 00 00 00 00 00 00 00 00 > /tmp/hdmi_udp.cmd

# Relative mouse: status byte, X delta, Y delta, wheel
echo mouse_rel > /tmp/hdmi_udp.cmd
echo 08 14 00 00 > /tmp/hdmi_udp.cmd

# Absolute mouse: buttons, X low, X high, Y low, Y high, wheel
echo mouse_abs > /tmp/hdmi_udp.cmd
echo 00 01 00 01 00 00 > /tmp/hdmi_udp.cmd

# Stop HID input
echo hid stop > /tmp/hdmi_udp.cmd
The absolute coordinate interface uses an X/Y range of 0–4096, scaled to the screen resolution. Bits 0, 1, and 2 of the button byte represent the left, right, and middle buttons. Relative mode uses a status byte containing button states, X/Y signs, and overflow flags; encode input according to that interface format.
3. Browser access and WebRTC audio/video
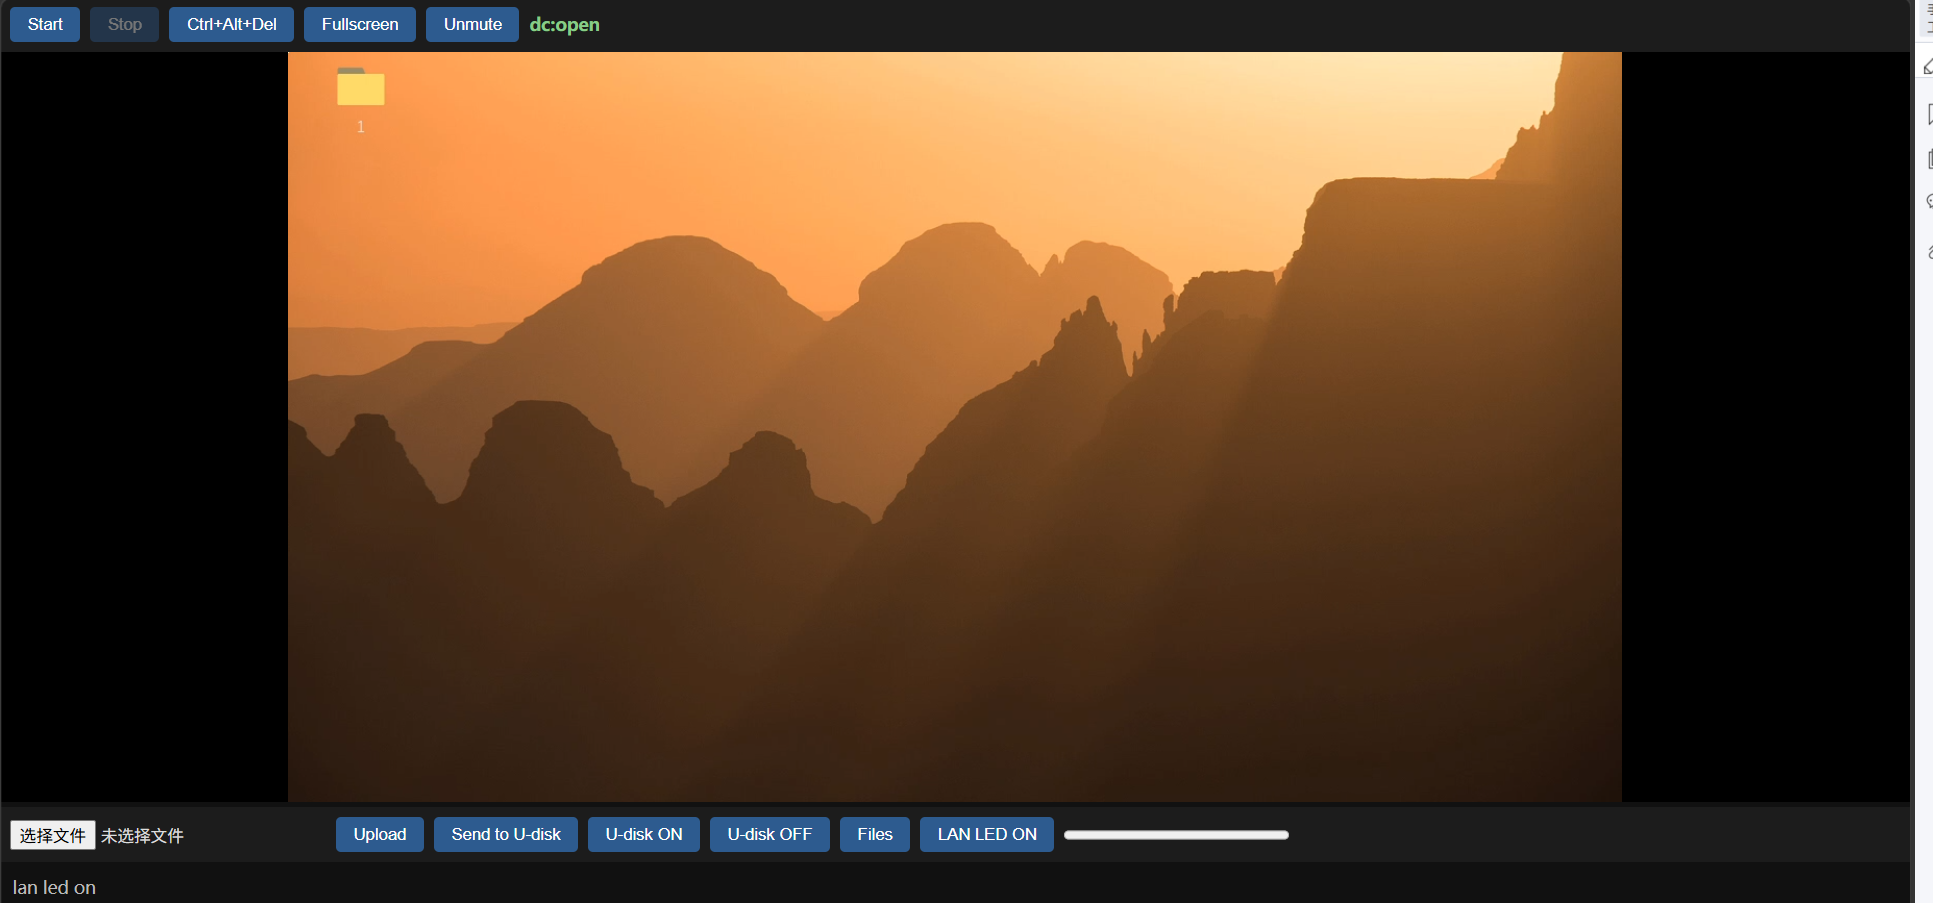
The demo starts its web service automatically at boot. On the same LAN, open the board's network address:
http://BOARD_IP:8080/Click Start to connect. Once video appears, control the keyboard and mouse through the page. The interface includes Ctrl+Alt+Del, Fullscreen, and Unmute, together with file upload and emulated USB drive controls.
| Item | Current demo configuration |
|---|---|
| Video codec | H.264 |
| Video bitrate / frame rate | 12 Mbps / 60 fps |
| Audio codec | Opus |
| Audio sample rate / channels | 48 kHz / stereo |
| Browser access | WebRTC audio/video and web keyboard/mouse control |
These are settings for the supplied demo, not performance guarantees for every resolution or network condition. Actual behavior depends on the video source, firmware configuration, and network environment.
4. USB keyboard, mouse, and emulated storage
When USB0 connects to the controlled host, the board simultaneously provides a HID keyboard/mouse and an MSC emulated USB drive as a composite device. Users can push files to the emulated drive while operating the keyboard and mouse through the web interface.
- Select a file and click Upload to send it to the board.
- Click Send to U-disk to push it to the emulated drive; some workflows push automatically after upload.
- A log message reading
u-disk OK: file listindicates success.
The current demo supports an emulated drive capacity of up to 4 MB. A single file must fit within that capacity, and available free space must also be considered.
5. Desktop diagnostics
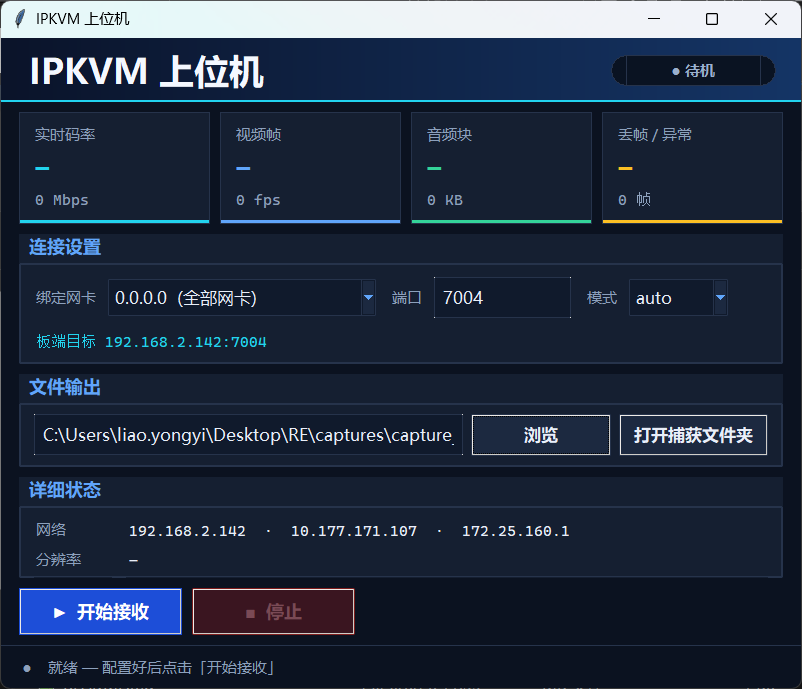
The desktop client provides reception and diagnostic controls. Users can choose a network adapter, listening port, and mode; configure the output folder; and inspect bitrate, video frames, audio frames, and dropped-frame or error information. Addresses and ports shown in the screenshot are example settings and must match the board's target configuration during integration.
This interface can serve as a reference for custom management tools that combine network status, reception statistics, and application operations.
6. Access across networks
When the browser and board are on different LANs, the demo's built-in ZeroTier support can connect them through a virtual network. Join the board and access device to the same virtual network, authorize them in network management, and access port 8080 at the board's virtual network IP address.
The demo stores its network ID configuration in /etc/init.d/S95zerotier; update it for your own network. The web workflow remains the same across networks. Direct connectivity and actual latency depend on the network conditions at both ends.
7. Solution value and project inquiries
Open interfaces enable application customization, while integrated hardware simplifies product integration. Combining video, USB, and networking on one board and reusing the existing demo can reduce the work needed to assemble peripheral modules and develop basic functions, supporting an IP KVM product that balances capability and cost.
For prototype evaluation, application-layer interface documentation, or custom development support, contact doc@ultrasemi.com. Please include target video specifications, network deployment, custom features, product form factor, and expected quantities to help define the hardware configuration and development scope.